1. Introduction
Jola call recording solution provides recording capabilities with flexible and secure controls on calls made via our SIP Trunks and Direct Routing. Call recording can be activated using SIP Manager. It is administered within a self-service Call Recording platform.
The retention period of the call recordings is flexible and can be extended up to a period of 7 years.
2. Teams Call Recording
Jola Teams Call Recording is a user-based recording. This means that customer can choose which of Team Tenants’ users will be subject to call recording. Teams Call Recording can be enabled on a user by assigning the user to the Calling Plan with Call Recording.
Each Teams Tenant will be allocated one container to which all the tenant’s users with Call Recording enabled will be automatically assigned. All the calls of these users will be recorded within this container.
2.1. Enabling Teams Call Recording on a User
To enable Teams Call Recording on a user, you will need to assign a user a Calling Plan with Call Recording enabled. In order to achieve this, please follow the steps:
2.1.2. Go to the Teams -> Manage Tenant section on the left menu and choose the tenant for which you want to assign users with call recording capabilities to by clicking the ‘Details’ button on the right <see below>

2.1.3.
Click on the ‘Calling Plans’ tab to purchase Calling Plans with Call Recording <see below>
2.1.4. Choose ‘Unlimited UK Calling Plan with Call Recording’ (or any other plan that has ‘with Call Recording’ in the name) and then select a retention period (i.e. how long you want the calls to be stored) and click ‘Add’ <see below>
2.1.5. Go back to ‘Tenant user’ tab and assign the user to a Calling plan – insert user’s email address, select a number and then the Calling Plan
with Retention Period. Click on the green ‘+’ button to save the changes <see below>
2.1.6. Synchronise the changes by clicking ‘Login to Microsoft’ button. Confirm the changes. The Sync status next to the user will change to a green tick if synced successfully.
2.2. Creating a Teams Group
Teams Groups allow for allocating users into logical Groups, i.e. departments. Each Teams Group (e.g. Sales) can have a Team Leader (e.g. Sales Manager) assigned who will have access to all calls of users (e.g. Sales people) assigned to the Teams Group. Assigning users to the Teams Groups is not required.
To assign users to a Teams Group you will need to create a Teams Group first. To do so, please do the following:
2.2.1. Go to Call Recording -> Manage User section and click on the green ‘Create New’ button <see below>
2.2.2. Set the name of the Teams Group (e.g. Sales) and select to which tenant the Teams Group should be assigned to. Click on the ‘Save’ button <see below>
2.3. Allocating a user into a Teams Group
Once you have created the
‘Teams Group’ you can now assign users to it. To do so, follow these steps:
2.3.1. Go to the Teams -> Manage Tenant section on the left menu and choose the tenant for which you want to assign users with call recording capabilities by clicking the ‘Details’ button on the right <see below>
2.3.2. Click on ‘Call Recording’ tab. Find users you want to assign to a Teams Group and select the Teams Group you want to assign them to. Click ‘Save Changes’.
All
calls recorded are accessible via a standalone Call Recording platform (https://callrecording.sipmanager.co.uk/).
Once a user is assigned to a Calling Plan with Call Recording enabled, they
will automatically receive an email with the login details to the Call
Recording Platform.
There are
several access levels available for Call Recording Platform. Each access level
has different permissions available. The different access level types are
following:
|
Access Level Type
|
Listen to/Pause/Resume
recordings
|
Pause/Resume recordings
for all legs of a single call at once
|
Download/ Share
recordings
|
Archive recordings
|
|
associated to the user
|
associated to all users
within a Team Group
|
associated to all users
within the Teams Tenant
|
|
User
|
✓
|
|
|
|
|
|
|
Team Leader
|
✓
|
✓
|
|
✓
|
|
|
|
Data Controller
|
✓
|
✓
|
✓
|
✓
|
✓
|
✓
|
A user who got assigned a Calling Plan with Call Recording enabled will automatically be assigned with ‘User’ access role. If you wish to change the access level type for the user please follow the steps:
2.4.1. Go to Call Recording -> Manage Users section and find the user for which you want to change the access role by using search box and click on the green ‘Details’ button <see below>
2.4.2. To change the access role click on the ‘Role’ of the user. This will enable the list of all the access role options <see below>
2.4.3. Choose the role you want to grant to the user and click the green ‘Save’ button <see below>
If you wish to grant an access to Call Recording platform to a person who is not a Teams Tenant user but needs access to call recordings of users, this is possible by following these steps:
2.5.1. Go to Call Recording -> Manage Users section and click ‘Create User’ button <see below>
2.5.2. Type the email address of the person you want to grant the access to Call Recording Platform, choose what role you want to give to them and select containers they should have access to. ‘Data Controllers’ are the only type of users who can have access to more than a one container. Click ‘Create’ button <see below>
2.5.3.
The username and password will be presented.
Save the details somewhere safe as this is the only time the password is shown. Forward the details to the user you have created the account for. If you need to reset the password, you must go to the Call Recording Platform site to reset it (
https://callrecording.sipmanager.co.uk/) <see below>
3. SIP Trunk Call Recording
Jola SIP Trunk Call Recording is a network-based recording. This means that SIP Trunk Call Recording will record all the PSTN calls made on the SIP trunk the call recording was enabled for.
Each SIP Trunk will be allocated one container in which all the calls will be stored.
3.1. Creating a Call Recording Container
To use SIP Trunk Call Recording platform, you first need to create a container that will store your call recordings for a chosen SIP Trunk:
3.1.2. Go to Call Recording -> Manage Container section on the menu on the left and click on ‘Create New’ <see below>
3.1.3. Choose the name of the container and select the retention period from the drop-down list. You can choose a period from 1 up to 7 years. Click ‘Create’ button <see below>
3.1.4. Once Container is saved it will transfer you to ‘Manage Containers’ section that gives you the list of all containers you have created. This section enables you view and manage container(s) (i.e. change retention period, name of the container, etc.). In order to view details or make any changes on the container, click on the green ‘Details’ button <see below>
3.1.5. The Details sections shows container’s usage overview, i.e., total storage and duration retained, storage and duration retained in the current month, etc. In order to change retention period or the name of the container, click ‘Edit’ button <see below>
3.1.6. After making appropriate changes, click on the green ‘Update’ button
3.2. Enabling a Call Recording Container on a SIP Trunk
After creating a container, you will need to enable it on your SIP Trunk. In order to enable it on SIP Trunk follow these steps:
3.2.1. Go to the SIP Channel -> Manage section on the left menu and choose the trunk to which you want to assign container to by clicking the ‘Details’ button on the right <see below>
3.2.2. Click on the ‘Configuration’ tab and then go to ‘Call Recording’ section. Tick ‘Call Recording Enabled’ box and then choose the container you want to assign to the trunk. Click ‘Save’ button and since that moment all trunk’s PSTN calls will be recorded on the Jola Call Recording Platform <see below>
After your container is allocated to a SIP Trunk you can add users that will have access to the Jola Call Recording Platform.
There are several access levels available for SIP Trunk Call Recording Platform. Each access level has different permissions available. The different access level types are following:
|
Access Level Type
|
Listen to/Pause/Resume
recordings associated to all users within Container
|
Download/Share
recordings
|
Archive recordings
|
|
|
|
|
|
User
|
✓
|
|
|
|
|
|
Data
Controller
|
✓
|
✓
|
✓
|
|
|
To create a Call Recording platform user, please do the following:
3.3.1. Go to Call Recording -> Manage Users section. Click ‘Create User’ button.
3.3.2. Type the email address of the person you want to grant the access to Call Recording Platform, choose what role you want to give to them and to select containers they should have access to. ‘Data Controllers’ are the only type of users who can have access to more than a one container. Click ‘Create’ button.
3.3.3.
The username and password will be presented.
Save the details somewhere safe as this is the only time the password is shown. Forward the details to the user you have created the account for. If you need to reset the password, you must go to the Call Recording Platform site to reset it (
https://callrecording.sipmanager.co.uk/).
4.1. Accessing containers with recorded calls
4.1.2. The Call Recording container(s) you have access to are available in the ‘Recording Containers’ section. To access a container, click on the ‘View’ button on the right <see below>
4.1.3. You will then see an overview of each container including information on the all calls recorded (the retained duration of the calls and the storage space this represents) as well as the total duration of all calls recorded in the current month.
4.2. Listening to recorded calls
4.2.1. To listen to a call, click on the ‘Play’ button on the right <see below>

4.2.2. At the bottom of the screen a window will pop up and the recording will automatically start playing. You can stop, rewind and forward using the blue buttons in the middle.
4.2.3.
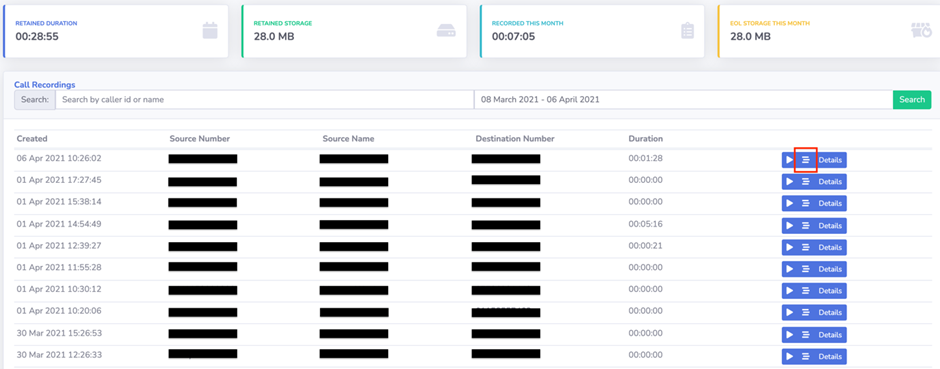
If you wish to listen to more than one recording, you can add the recordings to queue by clicking button with three horizontal lines <see below>.
4.2.4.
All the recordings in queue will be added to the waiting list in the window at the bottom of the page.

4.3. Pausing/Resuming in progress calls
4.3.1. To view the calls that are currently in progress go to ‘In Progress Calls’ section on the left menu. <see below>.
4.3.2. Within the ‘In progress Calls’ section you can pause your current call. There are two options to choose from:
4.3.2.1. Pausing the call recording for a single user – this can be achieved by clicking ‘Pause’
4.3.2.2. Pausing the call recording for all users on the call – this can be achieved by clicking ‘Pause All’ <see below>.
4.3.3. Once a call is paused you will need to specify the reason why the call is being paused <see below>.
4.3.4. If you wish to resume the call, click the ‘Resume’ button. This can be done at any point of duration of the call.
4.4. Downloading/Sharing a call (for Data Controllers only)
4.4.1. In order to download/share the recording click on the button with three dots at the top right corner and then ‘Download’/’Share’ button <see screenshot below>.
4.5. Archiving Calls (for Data Controllers only)
4.5.1. If you are a User allocated with Data Controller access, then you can also archive and unarchive the calls. To do so, click on the red ‘Archive’ button at the top of the page <see below>
4.5.2. A user allocated with Data Controller access can unarchive the call by clicking ‘Unarchive Call’ button at the top. If you are a user without Data controller access, then you will get information on who to contact if unarchiving the call is needed <see below>
4.6. Viewing details of a call
4.6.1. In order to view the detailed information about the recording go to the container page and click on the blue ‘Details’ button on the right <see screenshot below>.
4.6.2. In the ‘Details’ section you can view detailed information about the call, including ‘EOL (End of Life) Date’ (date when the call will be deleted) as well as Finger Print (allows to verify whether the recording has not been altered) and download or share the call <see below>.
4.6.3. If you click on “Audit Log” tab, you will be able to view the details of all the requests that have ever been made to access/download/archive/unarchive the Audio File <see below>
4.6.4. With Teams Call Recording product you additionally have the following features within the call section:
4.6.4.1. Viewing participants of the call (Name and Microsoft username). To view participants details go to ‘Participants’ tab within a call section <see below>
4.6.4.2. Viewing the timeline of the call (with history of what happened on the call, e.g. who initiated the call, when other users joined the call, or when the call was paused and for what reasons). To view timeline details go to ‘Timeline’ tab within a call section <see below>
4.6.4.3. Viewing related calls (e.i. same call but recorded for other users who were participating in the call and do have call recording enabled too).
To view related calls go to ‘Related Calls’ tab within a call section <see below>